Monday, October 3, 2011

A special 21st birthday

One of my co-worker's daughters was turning 21 this year. She wanted to do something special for her, but wasn't sure what, particularly since her daughter had pointed out that she didn't get a cake last year. Because she has seen the cakes I do, and seems to have a lot more faith in my ability than I do, she asked me if I'd be willing to make her daughter a very special 21st birthday cake. Knowing that the only way to face one's fear is to stand up to it and say, "I'm not afraid of you," I hesitantly agreed. Oh, by the way, another HUGE fear of mine is sharks. But I have no intention of jumping into shark infested waters and yelling, "I'm not afraid of you!" I'm also not stupid!

Anyhow, I advised my friend to find something similar to what she wanted and let me know. I told her the best place to look was...flickr. Ha! Bet you thought I'd say YouTube didn't you! Actually, I think we did end up on YouTube, but flickr is actually a great place to find cake ideas. There's some really great talent out there.

So we find a picture that she like's and I begin the task of recreating it, with my own twist, of course. Since her daughter likes zebra print, and pink is her favorite color, we decided on a pink, zebra striped cake.

Of course the fact that she's turning 21 couldn't go unmentioned so the addition of the martini glass was a must. And what good is a martini glass without the famous words of James Bond, "Shaken, not stirred?"

The cake flavor is chocolate, coated with buttercream and overlaid with pink marshmallow fondant. The cake board is also marshmallow fondant with oval cutouts that I replaced with green and red to look like olives. The glass is a real glass I picked up from Old Time Pottery (my oldest son works there. I love going in and harrassing him!). All the other decor was made with a gumpaste and fondant mix, 30/70.

The final verdict? She loved it. Would even let her mom cut it for two days! Another satisfied customer.

Friday, September 23, 2011

Strawberry Shortcake (2011)

So, my husband's grandaughter decided she wanted a princess cake for her 3rd birthday, Cinderella, to be specific. I was kinda excited about this, as I've not had the opportunity to try making a doll cake. I'd bought the Wondermold pan a while ago hoping for an opportunity such as this. I have 4 boys, if one of them asks for a doll cake, I'm gonna be a little concerned!

Anyhow, I researched doll cakes and found some great idea on...you guessed it, YOU TUBE! I love that site. So, I figured out what I was gonna do, and wouldn't you know it? She decides she wants a Strawberry Shortcake, princess cake. I deflate like a balloon for a moment, then decide, no biggie. I can do this. I'll just employee the same method and...hold on a minute, Strawberry Shortcake is like 6 inches tall, max. I suddenly realize that I can't make this massive skirt with my Wondermold. She's gonna look like her legs are far too long for her body.

I didn't expect Gracie wanted her princess on stilts so I had to go back to the drawing board and come up with an alternative plan. I still wanted to do the skirt out of cake cause I was dying to try all the little frills (if you get a chance, look up mackandnorm on You Tube, she has done some beautiful cakes!), so I had to figure out a way to make the skirt smaller.

Well, wouldn't you know it, the wonderful people over at Wilton make a mini-Wondermold cake pan so I head to one of my favorite stores, Michael's, all set to buy a new pan. Wouldn't you know, they were out of them? Just my luck. No biggie, I'll just head on over the Hobby Lobby and...well hell, they were out too. Luckily, one of the workers was stocking their cake supplies and told me she'd order an extra one for me. It came in that Thursday.

Next I had to figure out how to elongate it a bit, as the mini-Wondermold was too small for Strawberry's skirt. I needed a 4-inch round pan. And guess what...yep, no one carries those. Dang it! It's time for drastic measures. I pull out my ipad and go to the second most dangerous place on all the net...Amazon.com. That site has spelled many a disaster for unsuspecting credit cards. Luckily, I find a mini-tiered cake set that comes with two 4-inch, two 3-inch, and two 1-inch pans (so cute!).

So I have all my pans, I've baked my cakes, and I'm ready to decorate. Remember my Lightning McQueen cake I posted a couple of weeks ago? (if not, you can search for it in the search box). Well both cakes were due on the same day. Have I mentioned how slow I am? Like a 3-toed sloth. Or maybe I'm just too much of a type-A personality. Anyhow, I worked on my nephew's Cars cake until midnight. Then I started on my grandaughter's Strawberry Shortcake. Long story short, I was up 'til 6 am but it turned out beautiful. Don't you think?

Tuesday, September 6, 2011

Lightning McQueen (2011)

My nephew was turning 2 and he wanted a Cars cake for his birthday party. I got a few great ideas from the internet, You Tube included (told you I have a You Tube addiction). After sorting through various designs, I kinda incorporated a few into one.

My first goal was to figure out how to make the car shape. From what I read, most people carved theirs out of a stacked rectangle cake. This seemed a bit daunting to me, as I've never carved anything out of cake, let alone an entire car! I knew Wilton made a 3D car pan, though it was more of a coupe or Volkswagon-like shape. I figured that was better than nothing. Perhaps with a little carving, I could make it work.

As you can see, I did manage to get a decent Lightning McQueen shape. The front end is a little flat. In retrospect, I should have built it up with some pieces of cake or even fondant. But I don't think Paxton cared. He seemed to love it anyway. I also got several compliments on it so I was happy with the result.

Of course, no car cake is complete with out some car-ish paraphernalia. I added some orange caution cones, some big tires with racing tread, and a few signs here and there.

And of course, no Cars cake is complete without a Radiator Springs sign. I love the little round cactus with the pink and yellow flowers. The car cake is made out of a cream cheese pound cake, the bottom tier is a 14 inch round, 3 inch tall yellow cake and covered in marshmallow fondant. Most of the nicknaks were made out of regular fondant and/or gumpaste.

*You can see more of my cake designs on my Flickr page*

Tuesday, August 16, 2011

Deacon's 9th Birthday Cake (2011)

August is my busiest month for making cakes. I have 3 out of 4 boys with birthdays between August 12 and September 1st, a nephew whose birthday falls on the 22nd, a grandaughter on the 29th (same as one of my boys!), and two friends at work. Needless to say, by the time I'm done, I don't want to look at, eat, or even think about cake. I suppose part of the problem is that I'm so OCD that I spend hours on each one, which inevitably leads to me being up until midnight several nights and then having to get up for work at 5 am. I don't know about you, but if I don't get close to 8 hours, I'm like a zombie. My ass get left in the parking lot at work and my attitude can be a little snippy.

All that being said, I think I'm addicted to cake decorating. Is there treatment for that? I get online (YouTube again, someone needs to ban that website, for my own good) and find way too many neat ideas that I want to try. With my cake orders piling up, I begin the task of design. I think figuring out what I'm going to do is worse than actually doing it! My grandaughter wants a Cinderella Princess cake, one with the doll stuck in a triangle shaped cake made to look like her dress. Okay, I have the Wonder Pan, I can do that. So I get my plan laid out, find some great tutorials on You Tube, and I'm ready to go.

Wait! Now she wants a Strawberry Shortcake princess cake. Gasp! My Wonder Pan is way too big for a little Strawberry Shortcake doll. So I rush to the dollar store, find a glass bowl small enough to make a rounded dome for the top of her dress, then get on Amazon--another website that should be banned. I find way too many neat things to order from there. And they deliver right to my door! How convenient is that?--I get on Amazon and find a mini-tiered cake set with small enough pans to make her dress. Whew, I think I got this one covered.

Next, I go to my youngest son and I say, "Son, what kind of cake do you want for your birthday this year?" He looks at me with those big, innocent, ice blue eyes and says, "Call of Duty Black Ops." I blink a few times, my brain going numb as panic sets in. What ever happened to Mickey Mouse? or Pirates? or Cowboys? What the heck am I supposed to do for a video game? A plethoria of ideas race through my head--helicoptors, guns, tanks--all of which seem frighteningly difficult.

I had a similar experience last year when he wanted something Army-ish. I must confess that I really pooped out on him and his cake left a lot to be desired. Oh, he loved it, none-the-less, but considering what I'm capable of, it really sucked. So much so that I won't even bother posting it. So this year, I really wanted to do something cool to make up for my lack of enthusiasm last year. I get online (do you see a pattern here? What would I do without the internet?) and I research Call of Duty cakes. Needless to say, there weren't too many ideas to be found. Aside from the basic military stuff, I couldn't find anything that really fit the request.

And then...hold the press, what's this? A cool guy decked out in neat weapons with the words Call of Duty Black Ops boldly displayed across a yummy expanse of cake. I couldn't believe my eyes. Someone else in the world had actually wanted the same cake as my son! With my creative juices flowing, I set out to make the coolest cake any 9-year-old ever had. I "borrowed" the basic ideas from Sweet Perfection's Blog, then added my own flair. I'm happy to say my son loved his cake and his friends and he had a blast devouring all the grenades and stuff. The only inedible item was the barbed wire (made from covered wire). Everything else you see was made from fondant or tootsie rolls. I did go back and add a little grass around the tootsie roll fence posts after I took these pics. While I think I need to work on my character sculpting skills a bit (this was my first person), I am pleased with how it turned out. I've made all kinds of fondant and gumpaste flowers, sculpting people is a whole new ballgame. I won't even get in to how I made the machine gun in his hands.

One cake down. Now I've got to design a Cars cake with Lightning McQueen and make the Strawberry Shortcake Princess. My oldest son's request isn't too difficult, a strawberry cake with white buttercream icing and chocolate covered strawberries. Son number 3 has yet to place his order. Good lord, I hope he doesn't want something outlandish like a skateboard!

Tuesday, May 31, 2011

Spongebob Squarepants!

Well, I finally ventured into making a cake and getting paid. I've been so nervous about this for so long. My biggest fear? What if I screw it up? I don't want to be responsible for ruining someone's special day. Common sense tells me to just look at what I've done thus far--wedding cake, multiple party cakes for family, etc. etc.--but I just couldn't get over that fear. Finally, a guy my husband works with asked him if he thought I'd be willing to do a cake for his son's second birthday. The lady who was supposed to do it backed out at the last minute and he was desperate. When my husband called me to ask, I immediately tensed up, held my breath, clenched my teeth, and probably sent myself on the verge of a stroke before I finally squeeked out, "What does he want?"

"Spongebob, I think. But it doesn't have to be anything elaborate, just a simple cake," my husband replied. Nothing elaborate? Does the man not realize that everything I do borders on the edge of obsessive compulsive with the finite detail? I can show someone a picture of anything I've done thus far, and while they are ooing and ahhing, I'm listing all the things that I could have done better. But I suppose that's the nature of most of us type A personalities.

So Mike (my husband's friend from work) emails me a picture of this spongebob cake he wants, with the promise of ordering the plastic characters to go on top. I look it over and immediately know I should be able to do it, no problem, but the ol' terror of screwing it up creeps in and I debate telling him it looks too hard. This guy and his wife came to my wedding, mind you. They saw the wedding cake and know what I'm capable of. As I rationalize out a gazillion ways to tell him I can't do it, that part of me that felt bad about his son not having his coveted Spongebob cake takes over and I agree without a specified price.

You see, that's another stumbling block to ever owning my own cake decorating business. I have no idea what to charge?!!! I hate coming up with prices. Sure, you can devise a reasonable price based on all the work you'll do (it takes me many hours to do a cake, sometimes days), but a trip to Walmart's bakery will show you quite frankly that they could get a spongebob cake, a wedding cake, or just about anything else they want for a lot less money. Who can compete with Wally World? So then you begin to wonder, is it worth it? Maybe I should just stick to making cakes for family for free. Then I don't have to worry about screwing it up (they'll still love me), or getting paid (because family always wants stuff for free). But that would make be a big ass chicken. Alas, I'll probably get into the cake decorating business one baby step at a time, throwing a tantrum the whole way.

All that being said, I don't think my Spongebob cake turned out too shabby.

Oooo...Who lives in a pineapple under the sea?

SPONGEBOB SQUAREPANTS!

Absorbent and yellow and porous is he.

SPONGEBOB SQUAREPANTS!
If nautical nonsense be something you miss...

SPONGEBOB SQUAREPANTS!

Then drop on the deck and flop like a fish!

SPONGEBOB SQUAREPANTS!


Yes, I've been watching that show far too much. Ha ha

Tuesday, May 24, 2011

Here is one of the cake pops I made to go with my sister's (Carrie) diva birthday cake. Before I discovered these little yummies, I threw tons of cake away. For all the cake decorators out there, you know how heart-wrenching it is to level your cake and then toss all the cut off away. For large cakes, (like my 3 tiered wedding cake) you're likely to throw away enough cake to amount to a whole 3-tiered cake! Albeit a smaller one. Anyhow, Wilton has introduced the idea of cake pops (probably been around longer than what I know of so forgive me if I've given credit in the wrong place).

Instead of throwing away your cut off, stuff it in a baggie and toss it in the freezer for cake pops. When you're ready to use it, crumble your thawed cake into a large bowl. You'll need enough to amount to one box mix (about a 9 x 13 cake or two 8 inch cakes). You can use less or more, you'll just have to adjust the amount of icing you add accordingly.

Next, spoon about 1 cup of icing into your crumbled cake. You can use some left over buttercream or store-bought. It doesn't matter.

Then, use your hands and mix it all together until it forms a dough. Kinda the consistency of playdough. Yeah, you can be a kid again and claim your cooking. How fun is that?!

After you've mixed it all up, take a cookie sheet and lay a piece of wax paper on it. Begin rolling balls out of your dough. I usually make them about 1-1 1/2 inch diameter. Any larger and they will fall off the sticks when you go to dip them in chocolate.  When you've finished rolling your balls, place them in the fridge for about 10 minutes or so to let them firm up. While they are in there, you can prepare your chocolate dip.

For this next part, you'll need candy coats or almond bark, or heck, I suppose even chocolate chips will work. Just some sort of meltable chocolate. Candy coats work good if you want a colored chocolate on your pops. Melt your chocolate in the microwave (or stovetop, whichever you prefer). Add some vegetable shortening (the solid stuff, not liquid) to it and mix it in until you get a nice, syrupy texture, smooth, not thick. There is no magic amount here, just add a little at a time. Like 1/2 tsp or so. Don't put a big glob in there or it'll taste like shortening (yuck!).

When you're chocolate is melted and a good consistency grab your cake balls out of the fridge. Insert a sucker stick about 1/2 inch or so into melted chocolate, then immediately stick it into a cake ball. Work quickly while the cake balls are cold. This help solidify the chocolate on the stick inside your ball so it will stay in place. Once you've added sticks to all your balls, place them back in the fridge for a few more minutes. At this point, you may want to stick your chocolate back into the microwave for a few minutes to make sure it hasn't started to harden on you. In the meantime, grab a styroform board and get ready to dip!

After about 5-10 minutes, take your cake balls (pops) out of the fridge. Holding the pop by the stick, dip it down into the chocolate and then quickly pull it back out, using a slight twirling action. Holding the now dipped pop at an angle, gently tap the stick against the edge of the chocolate container or against your finger, gently tapping off the excess. I also slowly turn the pop as I do this, helping to get a nice smooth coat over the pop.

If you want sprinkles or dragees or candies (m&m for example) on your pop, add them now. Hold pop over a bowl or container and sprinkle sugar or candy sprinkles, letting the excess fall into the bowl. You can gather this and reuse. Add dragees or larger candies by hand. I use a pair of tweezers. It helps.

After you've decorated your pop, stick it into the styrofoam to dry. Once dried, cover with a celophane bag and tie closed with decorative ribbon or twist tie. There's also pretty pop wraps you can buy.

For presentation, you can purchase cake pop boxes which allow your cake pops to stand up. I think they hold about 12 pops. I used a white box with a celophane window and just laid my pops inside using pretty tissue paper to make it fancy. Kind of like wrapping a shirt or something for a christmas present. I added some glitzy stickers to the box and viola, a fancy diva cake pop box that matched Carrie's diva cake.

Carrie's Diva Birthday Cake (2011)

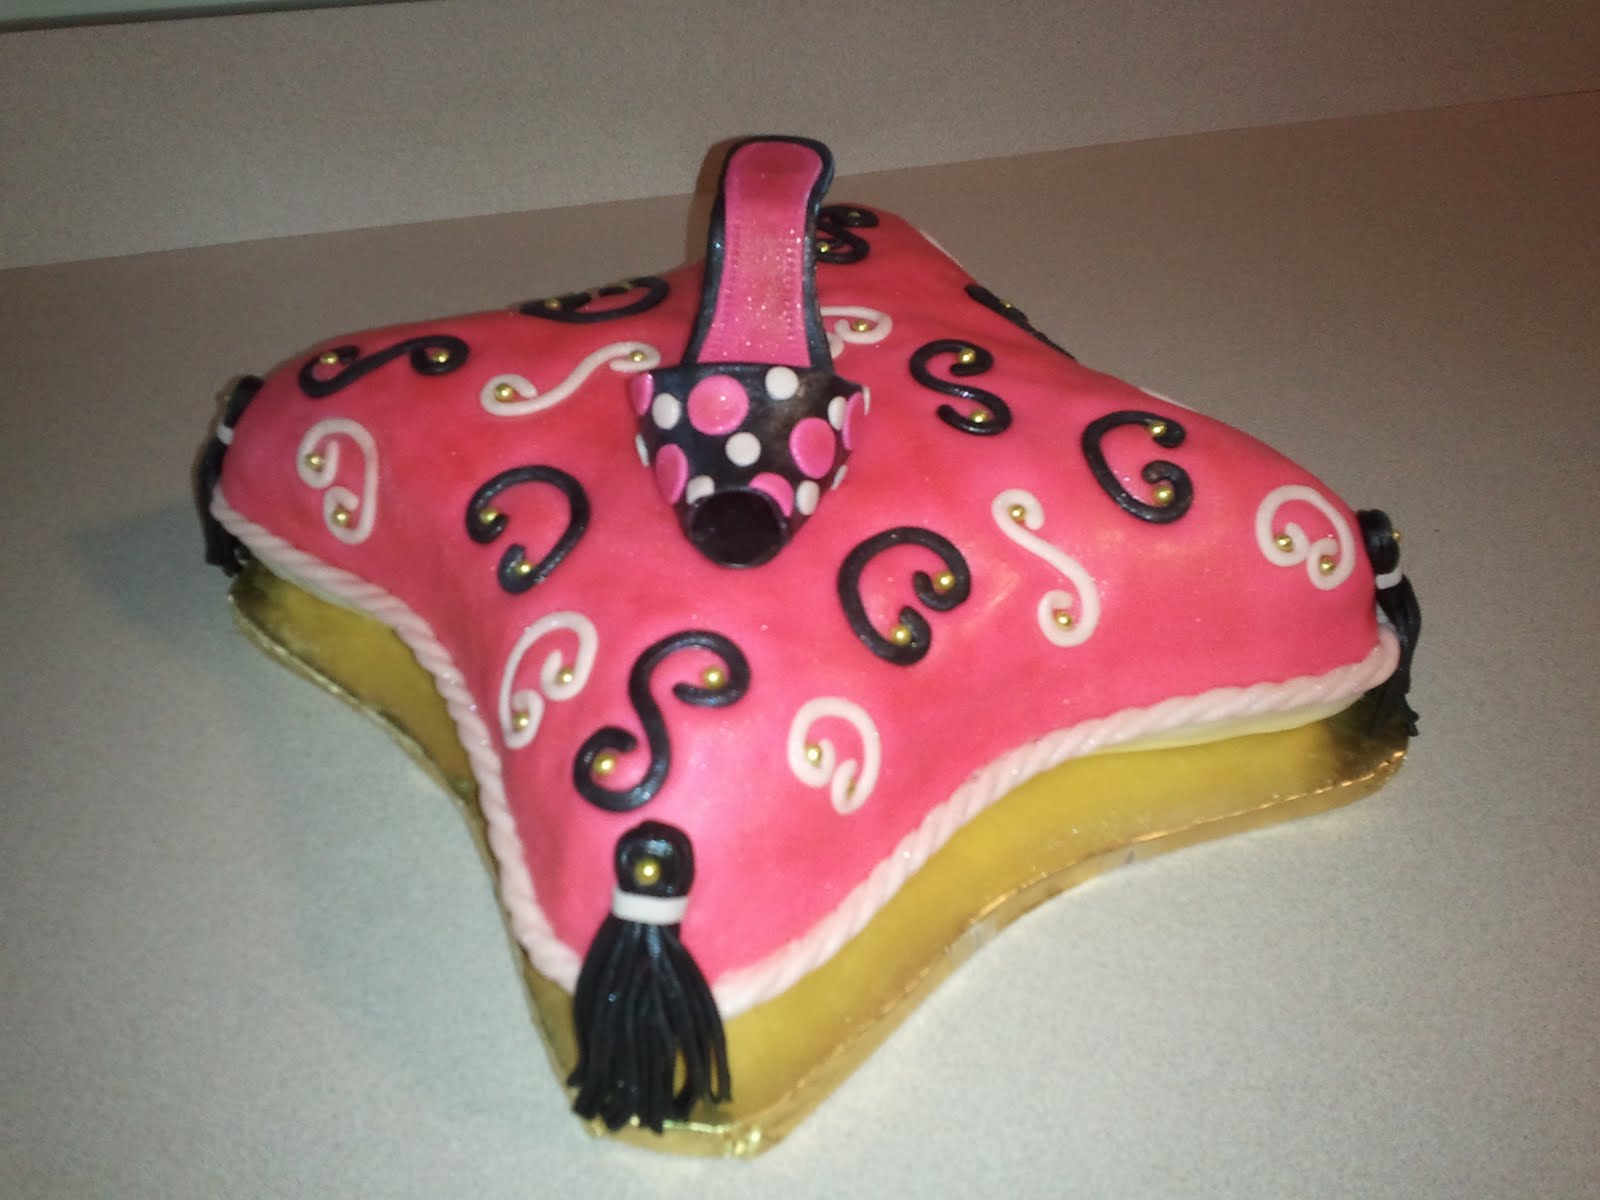
This was Carrie's (my sister) birthday cake. It was also my first fondant shoe and my first pillow cake! I was really pleased with how it all turned out. Of course, I learned a few little tidbits to improve on my next shoe/pillow cake, but overall, I couldn't complain, and she loved it.

The cake is two pillow halves covered in homemade marshmallow fondant and placed together with buttercream. It's easier if you place the bottom, bottom side up, on top of a coffee can or some sort of raised base. Cover with buttercream, let crust, then cover with your marshmallow fondant. Trip excess, then put a dallop of buttercream in the center of your cake board, place against center of bottom, and then flip the whole thing over. Now your bottom is face up and ready for the other half of your cake.

I read somewhere that said to cover both halves before placing together. Let me suggest only doing the bottom first. Next make your dam of icing and fill with buttercream. Then turn top over onto bottom. Because you have to kind of smash them together to make your seam as small and tight as possible, if you cover your top with fondant first, you will leave fingerprints all in your nice smooth fondant (yep, I did as the instructions said and was very unhappy about that). While you can certainly go back and resmooth, I think it would be easier to just wait and cover the top half with buttercream and fondone after you've placed it on the bottom and completed your pillow shape. If the next trial proves otherwise, I'll be sure to come back and let everyone know.

Here's a side view of the shoe. I found a great tutorial on You Tube for how to make this using a cardboard template. You can make variations, such as adding a back or leaving the toe closed, etc. I wanted something "girlie" and chic so I went with the
pink and black color, and open-toed sandal. The gold cakeboard and gold dragees added a nice touch and really stood out against the pink.

Here's a closeup of the tassels, trim, and curls. The gold balls are dragees. Everything (except the toothpick holding the tassel on the cake and the cake board, of course) is edible. The dragees are a little hard so cruching on those might crack a tooth, but the kids liked them and the cat thought they were fun to chase, particularly when I dropped several trying to place them on the cake. I purchased a clay extractor from Michael's to make the tassels, curls, and cord trim. As long as you don't use it for clay and only use it for food products, it should be fine. It's also cheaper than buying an official "fondant" extractor. I loved how the cord seemed to pull the two sections together and covered the seam. I don't know if you can see it or not, but I also covered the entire cake with luster dust. Sorry, but the "girlie" girl in  me loves the sparkle.